
James Hardie Matrix Cladding Installation Guide (NZ)
James Hardie Matrix Cladding Installation Guide (NZ) – James Hardie Matrix™ Cladding offers a bold, industrial, and modern aesthetic that has become exceptionally popular in contemporary New Zealand architecture. Its geometric, expressed-joint look allows for incredible design flexibility, creating a striking facade for both residential and commercial buildings. This system uses fibre cement panels fixed over a cavity, delivering a durable and low-maintenance exterior finish.
This guide provides a comprehensive overview of the key steps and considerations for a successful project. While this article is detailed, it must be used in conjunction with the official James Hardie New Zealand technical specifications and installation manuals. Adhering to the New Zealand Building Code (NZBC) is paramount for a compliant and durable james hardie matrix cladding installation nz.
Understanding James Hardie Matrix™ Cladding in the NZ Context
Matrix™ Cladding is a durable exterior cladding system manufactured from premium fibre cement. The panels are sealed on all sides and feature clean, square edges, designed for a distinctive expressed joint finish. This system is particularly well-suited to the diverse and often challenging weather conditions found across New Zealand.
The inherent properties of fibre cement make it an ideal choice for the local environment. It is resistant to fire, damage from moisture and rotting, and can withstand high impact, making it a robust solution from Northland to Southland. The james hardie matrix cladding installation nz process is designed to create a pressure-equalised drained cavity, which is a critical feature for managing moisture and ensuring the long-term health of the building envelope, a key requirement under the NZBC. Furthermore, the design flexibility allows architects and builders to create unique looks, from vertical or horizontal layouts to staggered brick-like patterns, that complement New Zealand’s modern design trends.
The system’s performance is backed by extensive testing and a BRANZ appraisal, giving specifiers and homeowners confidence in its suitability. This appraisal confirms that the product, when installed as per the manufacturer’s literature, meets the performance requirements of the New Zealand Building Code. A successful james hardie matrix cladding installation nz relies on understanding these product characteristics and regulatory requirements from the outset.
Pre-Installation: The Foundation for Success
Thorough preparation is the most critical phase of any cladding project. Before the first panel is even considered for fixing, a series of checks and preparatory steps must be undertaken to ensure a smooth, efficient, and compliant installation. This stage involves gathering the right equipment, meticulously inspecting the building structure, and planning the panel layout for optimal aesthetics and material usage. A well-planned james hardie matrix cladding installation nz will prevent costly errors and delays down the line.
Essential Tools, Materials, and Safety Gear
Gathering the correct tools and materials is fundamental for a professional finish. For cutting the panels, a circular saw fitted with a James Hardie™ HardieBlade™ or a compatible polycrystalline diamond (PCD) tipped blade is required. Ensure the saw is connected to an M-Class or H-Class vacuum for effective dust extraction.
Other essential tools include a drill with a torque-limiting clutch, a spirit level, a laser level, a chalk line, measuring tape, and sealant application guns. The material list will include the Matrix™ Cladding panels themselves, James Hardie HomeRAB™ or other suitable rigid air barrier, flashing tapes, corrosion-resistant fasteners (screws), James Hardie cavity battens, and purpose-made PVC or aluminium architectural mouldings for corners and joints. Crucially, a full set of Personal Protective Equipment (PPE) is non-negotiable, including safety glasses, hearing protection, and a P2-rated dust mask for respiratory protection during any james hardie matrix cladding installation nz.
Preparing the Building Frame and Substrate
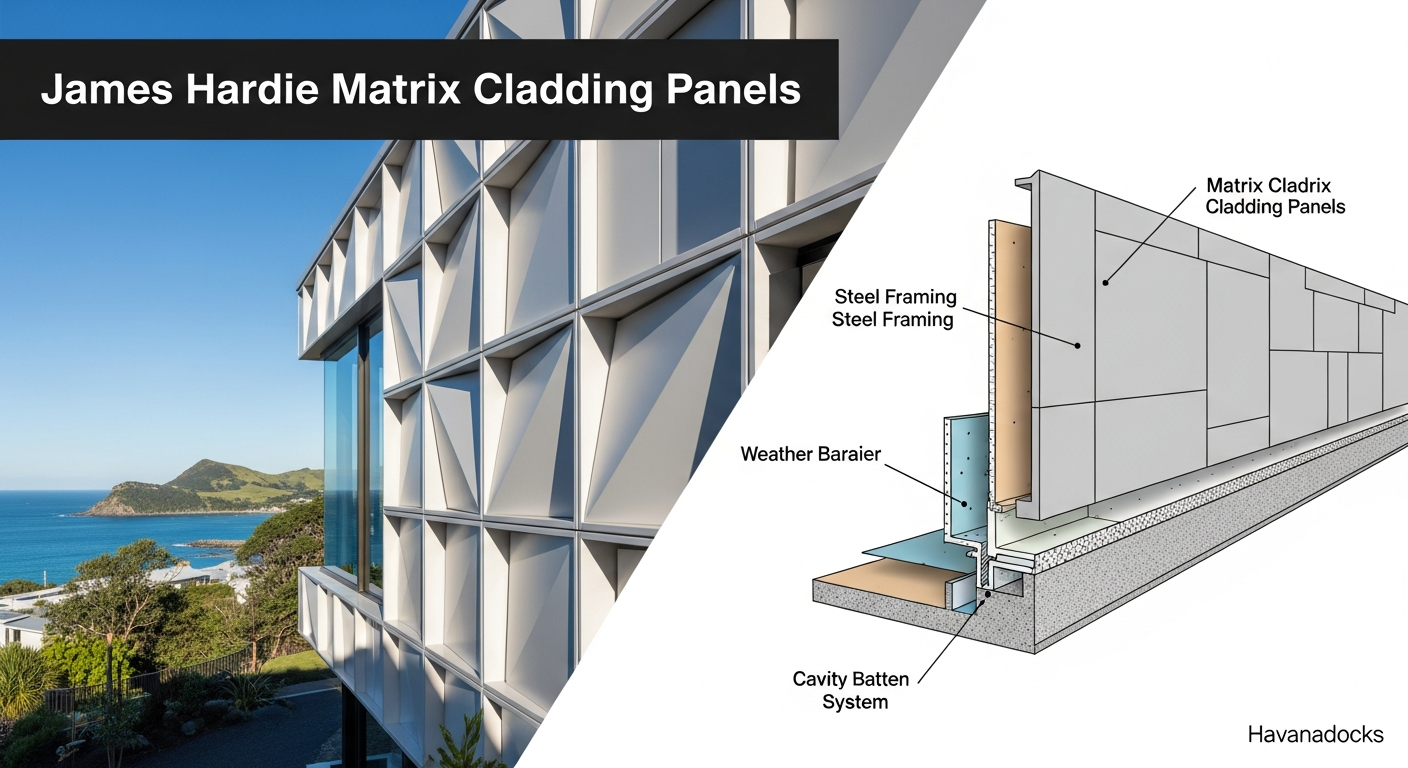
The quality of the final cladding finish is directly dependent on the quality of the underlying structure. The building frame, whether timber or light gauge steel, must be straight, plumb, and true. Any deviations in the frame will be magnified on the flat, smooth surface of the Matrix™ panels.
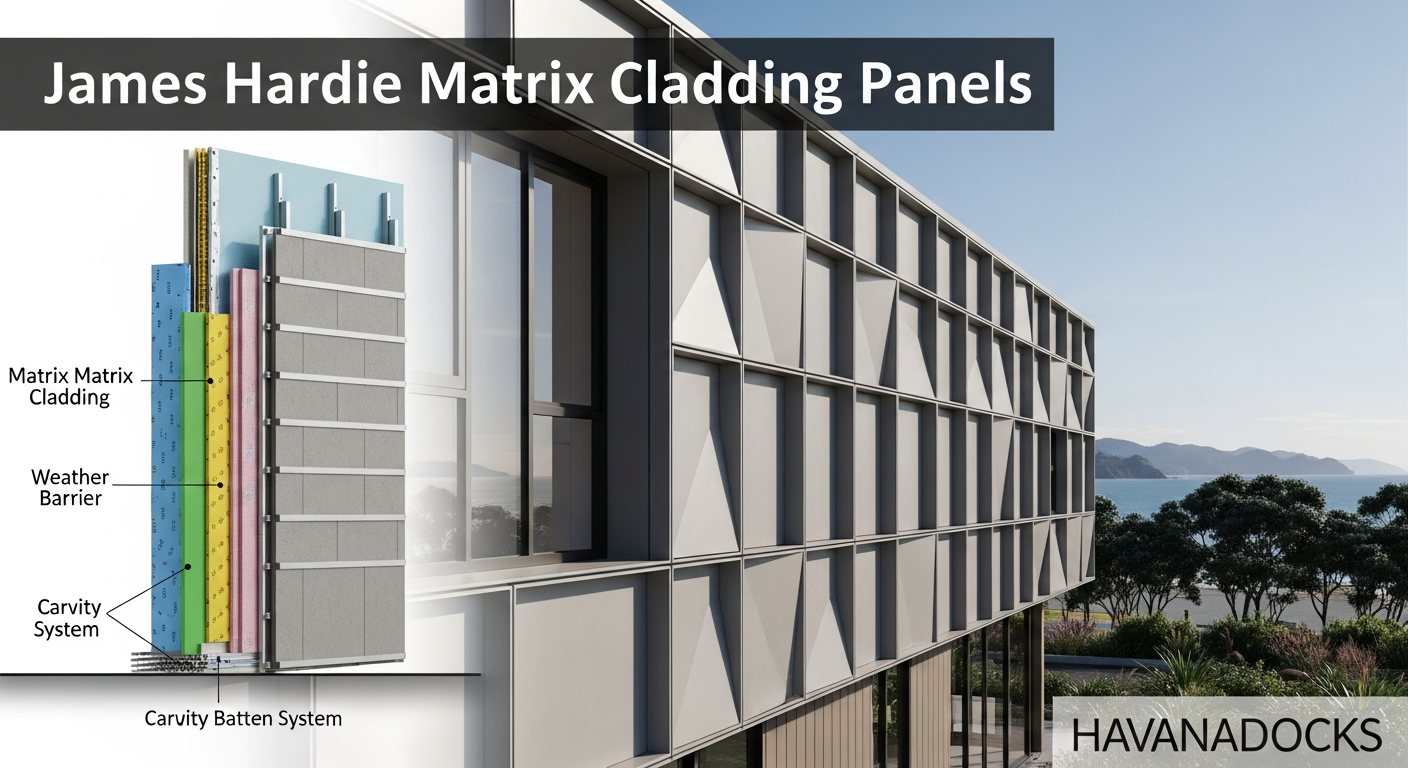
For timber framing, ensure it complies with NZS 3604. Check for and rectify any bowed studs or misaligned framing members before proceeding. The next step is the installation of a compliant rigid air barrier, such as James Hardie HomeRAB™ Pre-Cladding, over the entire building frame, which forms the primary line of defence against air and moisture ingress. All sheet joints and penetrations must be correctly sealed with flashing tape as per the manufacturer’s instructions to meet the requirements of NZBC Clause E2/AS1 External Moisture, a vital aspect of any james hardie matrix cladding installation nz.
Panel Layout and Set-Out
Careful planning of the panel layout is essential for both aesthetic appeal and material efficiency. Matrix™ Cladding panels are available in various sizes, and the layout can be oriented vertically, horizontally, or in a staggered pattern. This design decision should be finalised before any installation work begins.
Use a laser level and chalk lines to accurately set out the intended grid pattern directly onto the rigid air barrier. This provides a visual guide for placing cavity battens and panels. Plan the layout to minimise panel wastage, considering the locations of windows, doors, and other penetrations to achieve a balanced and symmetrical appearance. A well-considered set-out is a hallmark of a professional james hardie matrix cladding installation nz.
The Core Installation Process
With all the preparation complete, the core installation can begin. This process is methodical and requires precision at every step, from establishing the cavity to fixing the panels and detailing the joints. Following the sequence correctly ensures the system’s integrity, weathertightness, and visual appeal. This stage is where the planned design of your james hardie matrix cladding installation nz becomes a reality.
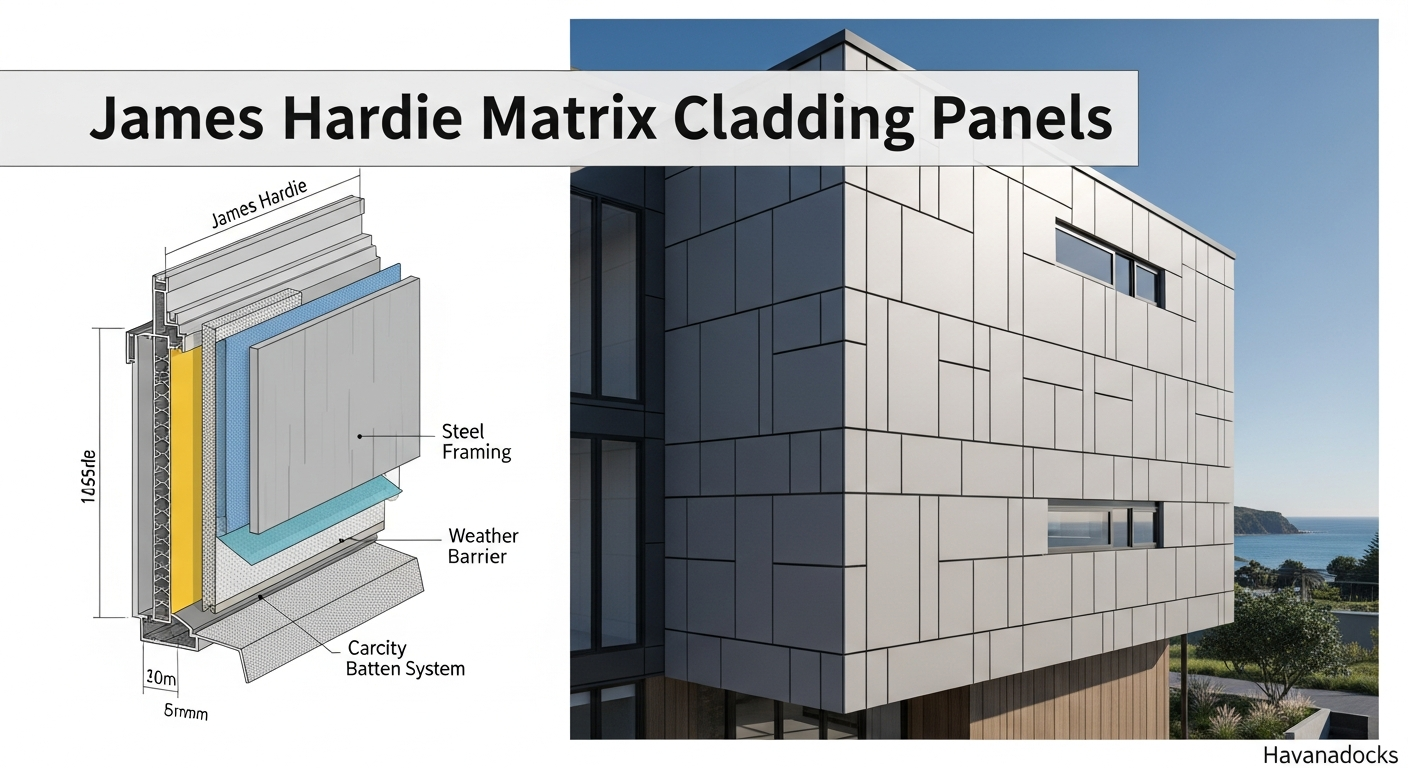
Setting Up the Cavity System
The cavity system is the heart of the cladding’s performance in New Zealand, providing a crucial drainage and ventilation path. Start by installing all required flashings, including a base starter strip with vermin-proofing, sill flashings for windows, and head flashings above openings. These elements must be correctly integrated with the rigid air barrier and flashing tapes to direct any water safely out of the wall assembly.
Next, install James Hardie cavity battens vertically over the building frame. The battens must be fixed at specified centres, typically a maximum of 600mm, aligning with the stud locations. Following the correct procedure for the cavity system is a critical part of a compliant james hardie matrix cladding installation nz and is essential for achieving the necessary BRANZ appraisal compliance. Proper cavity setup ensures the longevity of the entire building.
Panel Handling, Cutting, and Fixing: The Foundation of a Professional Finish
The installation of James Hardie Matrix™ Cladding demands precision, care, and a firm understanding of best practices. Every step — from handling to fixing — affects not only the appearance of the façade but also its performance and durability. Fibre cement panels are robust and engineered for longevity, but they must be treated correctly throughout the process to preserve their structural integrity and design intent.
This section outlines the critical techniques and safety considerations for james hardie matrix cladding installation nz, helping installers achieve a flawless, compliant, and long-lasting result.
Safe Handling and Storage
Before any cutting or fixing begins, correct handling is essential to prevent edge damage, cracking, or chipping — especially along corners and cut edges. Fibre cement panels should always be lifted by two people using a firm, even grip along the edges, rather than dragging or sliding them across the ground.
When delivered to site, panels must be stored flat on a level surface, supported on evenly spaced timber bearers to prevent warping. They should be covered with a waterproof, breathable membrane to protect them from moisture before installation. Direct contact with wet ground must be avoided.
If panels become damp prior to installation, allow them to dry fully before fixing, as moisture movement can lead to joint misalignment or uneven appearance once installed. Following these simple handling principles is the first step toward a professional-grade james hardie matrix cladding installation nz.
Precision Cutting and Dust Management
Cutting is one of the most critical — and hazardous — aspects of working with fibre cement. The panels contain crystalline silica, which, when cut or drilled, releases fine dust particles that can pose serious health risks if inhaled. To comply with WorkSafe New Zealand standards, strict dust management procedures must be followed at all times.
Only use power tools fitted with a HardieBlade® (polycrystalline diamond – PCD) circular saw, connected to a HEPA-filtered dust extraction system. This setup is proven to significantly reduce respirable crystalline silica (RCS) levels.
Always:
-
Perform cutting outdoors or in a well-ventilated area.
-
Wear the appropriate P2 respirator mask and eye protection.
-
Position the panel so the saw blade cuts downward into the finished face, minimising edge chipping.
-
Use a saw guide or straightedge for perfectly straight cuts, ensuring crisp, clean lines that align seamlessly at joints.
For intricate shapes or small cutouts around fixtures and services, the score-and-snap method is preferred. Using a tungsten-tipped scoring knife, lightly score the surface along a straightedge several times, then apply even pressure to snap the board cleanly. This method generates far less dust and offers precision in tight spaces.
Accurate, safe cutting is the backbone of every successful james hardie matrix cladding installation nz, ensuring that every joint line remains sharp and every edge aligns flawlessly within the grid design.
Fastening Panels to the Cavity Batten
Once all panels are cut and prepared, the next phase is secure fixing. Begin installation from the bottom corner of the wall, ensuring the first course is level and properly supported. Working upward and across the façade allows for consistent alignment and panel spacing.
Each Matrix panel must be fixed directly to the vertical cavity battens using the specified corrosion-resistant screws, as outlined in the James Hardie technical manual. These fasteners are typically stainless steel or Class 4 galvanised, selected for their long-term performance in New Zealand’s variable weather conditions.
Key Fastening Guidelines:
-
Drive screws flush to the surface — never over-driven, as this can crack or weaken the board.
-
Maintain the specified fastener spacing and edge distances to ensure structural integrity and compliance.
-
Use a level and chalk line to maintain straight courses and perfectly aligned horizontal and vertical joints.
Between each panel, maintain a uniform 10mm expressed joint — one of the defining features of the Matrix aesthetic. This joint not only enhances visual rhythm and depth but also accommodates natural movement caused by temperature fluctuations and moisture. A temporary 10mm spacer or packer is a practical tool to ensure consistent gap spacing across the façade.
After fixing, all joints are typically finished with James Hardie aluminium or PVC express joint profiles, which protect panel edges and reinforce the clean, geometric look that defines the Matrix design system.
Checking Alignment and Finishing Touches
Precision installation requires periodic checks for alignment and surface flatness. Stand back and visually inspect the façade as you progress to ensure the panel grid remains true. Minor deviations can become visually amplified once the full elevation is complete.
Pay particular attention to corners, junctions, and around openings — areas where craftsmanship is most visible. All fasteners should be rechecked for proper depth, and any surface dust removed before applying sealants or joint trims.
Following these meticulous steps ensures not only structural compliance but also the sharp, contemporary appearance expected of a professional james hardie matrix cladding installation nz.
The Foundation of Long-Term Performance
When done correctly, panel handling, cutting, and fixing form the foundation of a façade that will perform and impress for decades. Every screw, cut, and joint contributes to the system’s structural integrity, weather resistance, and architectural precision.
By adhering to these best practices and the official James Hardie installation guide, builders can confidently deliver façades that embody both craftsmanship and compliance — façades that look as good as they perform.
Ultimately, excellence in james hardie matrix cladding installation nz is achieved not by speed, but by precision — a commitment to doing every step right, from the first lift to the final fastener.
Finishing, Sealing, and Maintenance
The final steps of the installation process are crucial for ensuring the system’s long-term performance and appearance. This includes sealing the joints, applying a protective paint coating, and understanding the ongoing maintenance requirements. These finishing touches transform the installed panels into a complete, weathertight, and durable building facade. Completing these steps correctly is the final stage of a high-quality james hardie matrix cladding installation nz.
The expressed joints between the panels are a key design feature, and they must be correctly detailed. A black James Hardie EPDM joint backing flashing/strip is installed behind every joint, fixed to the cavity battens before the panels are attached. This flashing provides a waterproof background and enhances the shadow line effect of the joint. Some architectural designs may require the joint to be sealed with a flexible sealant over a backing rod, and in this case, a James Hardie recommended polyurethane sealant must be used.
All Matrix™ Cladding panels must be finished with a high-quality, 100% acrylic exterior paint system. Before painting, ensure all panels are clean, dry, and free of any dust or contaminants. Apply a primer and at least two top coats in accordance with the paint manufacturer’s specifications. The paint coating not only provides the final colour and aesthetic but also acts as the primary protective layer for the fibre cement, making it an essential part of the james hardie matrix cladding installation nz system’s durability.
Regular maintenance will ensure the cladding system continues to perform and look its best for years to come. This involves an annual inspection of the facade, checking for any damage to the panels, fasteners, or paint finish. The cladding should be washed down with a low-pressure hose and a soft brush to remove dirt and grime. Any minor damage to the paintwork should be touched up promptly to maintain the protective coating. Taking these simple steps is key to preserving the value of your james hardie matrix cladding installation nz.
Conclusion: Achieving a Professional Finish
Successfully completing a james hardie matrix cladding installation nz results in a visually stunning, modern, and highly durable building exterior. The key to this success lies not just in the final panel placement but in the meticulous planning and preparation that precedes it. From ensuring the substrate is perfectly straight to planning the panel layout and setting up a compliant cavity system, every step is foundational.
This guide has outlined the critical stages, from understanding the product in the New Zealand context to the final paint and maintenance procedures. Always remember that this information is a supplementary resource. The official James Hardie technical literature and BRANZ appraisal documents remain the definitive source for all specifications and must be followed without deviation. By combining careful workmanship with strict adherence to these official guidelines, you can achieve a professional and long-lasting finish that fully realises the potential of James Hardie Matrix™ Cladding.