
7 Brilliant DIY Kitchen Renovation Ideas to Transform Your Space
7 DIY Kitchen Renovation Ideas with Easy – Ready to breathe new life into your kitchen without emptying your wallet? These seven DIY kitchen renovation ideas are designed to be manageable, impactful, and easy on your budget. We’ll walk you through each project with step-by-step details, ensuring a smooth and successful transformation.

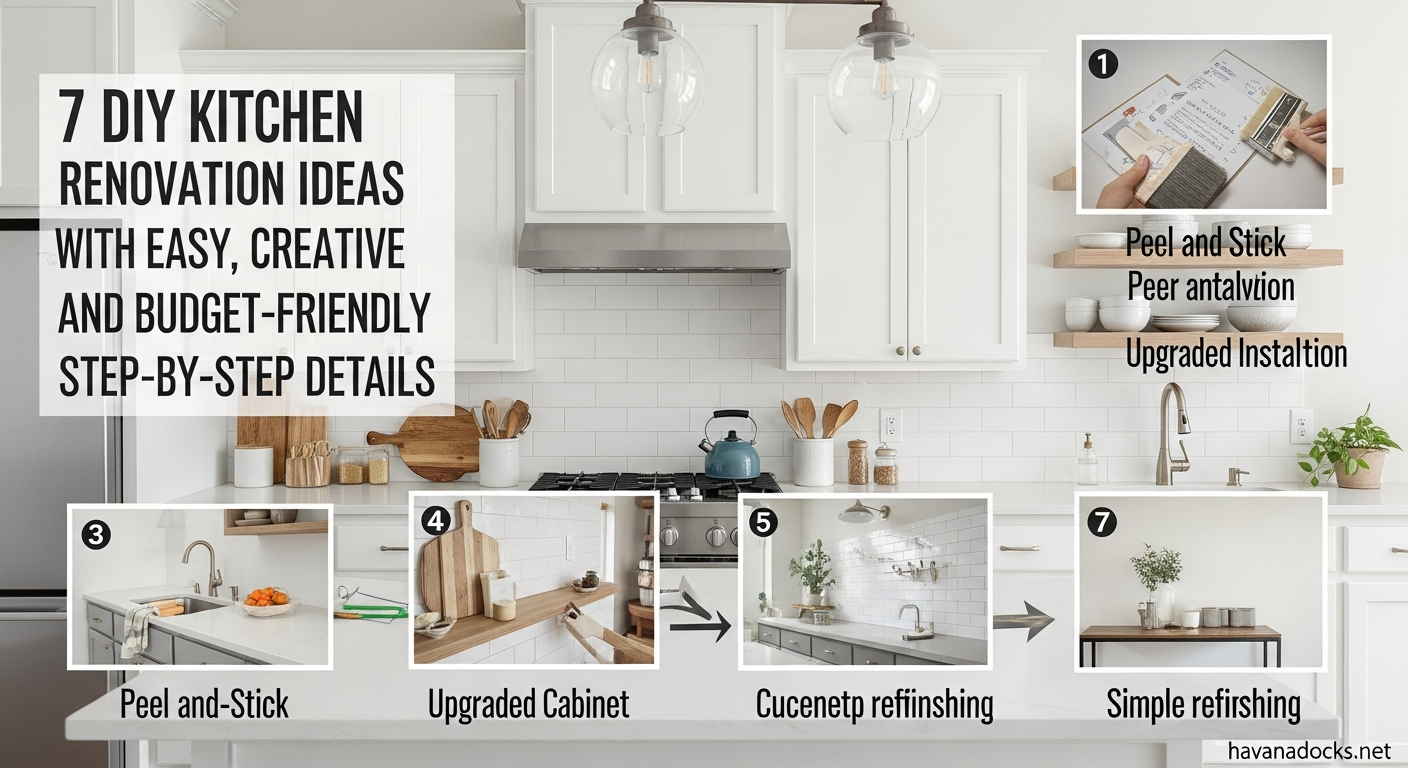
1. Cabinet Refresh: Paint & New Hardware
Giving your kitchen cabinets a fresh coat of paint is one of the most cost-effective and transformative DIY kitchen renovation ideas. Combined with new hardware, it can completely change the look and feel of your kitchen.
- Step 1: Preparation is Key. Remove all cabinet doors and drawers. Thoroughly clean them with degreaser and lightly sand them to create a smooth surface for the paint to adhere to. Fill any holes or imperfections with wood filler.
- Step 2: Priming. Apply a coat of primer specifically designed for cabinets. This will help the paint adhere better and prevent any stains from bleeding through. Let the primer dry completely according to the manufacturer’s instructions.
- Step 3: Painting. Apply two coats of your chosen paint color, allowing each coat to dry completely before applying the next. Use a high-quality brush or a sprayer for a smooth, even finish. Consider using cabinet-specific paint for durability.
- Step 4: Install New Hardware. Once the paint is completely dry, install new knobs and pulls. Choose hardware that complements your kitchen’s style and enhances the overall look. This small detail can make a big difference. Measure carefully before drilling any new holes.
- Bonus Tip: Consider painting the cabinet interiors a contrasting color for a pop of visual interest when you open the doors.
2. Backsplash Upgrade: Peel & Stick Tiles
Replacing your backsplash is another fantastic way to update your kitchen’s look without a major overhaul. Peel-and-stick tiles offer a convenient and affordable solution for a quick and stylish upgrade. This falls nicely under DIY kitchen renovation ideas, particularly for beginners.
- Step 1: Measure and Plan. Carefully measure the area you want to cover with the backsplash. Order enough tiles to account for any cuts or mistakes. Plan the layout of your tiles to ensure a visually appealing pattern.
- Step 2: Clean and Prep. Thoroughly clean the existing backsplash with a degreaser and ensure it’s completely dry. Remove any loose paint or debris. A smooth, clean surface is crucial for proper adhesion.
- Step 3: Peel and Stick. Peel off the backing from the tile and carefully align it with the wall. Press firmly to ensure it adheres properly. Work your way across the area, overlapping the tiles slightly for a seamless look.
- Step 4: Cut and Finish. Use a utility knife or scissors to cut the tiles to fit around outlets, windows, or corners. Smooth the edges with a damp cloth to finish the installation. Grout options are available for a more permanent and polished look.
- Important Note: While peel-and-stick tiles offer a quick solution, they might not be as durable as traditional tile. They are better suited for low-moisture areas and may require replacement after a few years depending on the quality and usage.
3. Open Shelving: Display Your Style
Replacing some of your upper cabinets with open shelving is a trendy DIY kitchen renovation ideas and budget-friendly way to create a lighter and more open feel in your kitchen. It also allows you to showcase your favorite dishes and decorative items.
- Step 1: Remove Existing Cabinets. Carefully remove the cabinets you want to replace with shelves. Be sure to disconnect any electrical wiring that may be running behind the cabinets. Patch any holes in the wall.
- Step 2: Measure and Cut Shelves. Measure the space where the shelves will be installed. Decide on the desired depth and spacing between the shelves. Cut the shelves to the appropriate size using wood or another suitable material. Sand and finish the shelves with paint or stain.
- Step 3: Install Shelf Brackets. Install shelf brackets to the wall, ensuring they are level and securely attached to studs. Use appropriate screws for the wall material. Space the brackets evenly to provide adequate support for the shelves.
- Step 4: Attach Shelves. Place the shelves on the brackets and secure them with screws from underneath. This will prevent the screws from being visible.
- Styling Tip: Arrange your dishes, glassware, and decorative items on the shelves in a visually appealing way. Use varying heights and textures to create interest. Group items by color or theme for a cohesive look.
4. Upgrade Your Lighting: Under-Cabinet Lights and Stylish Fixtures
Good lighting is essential in a kitchen. Upgrading your lighting fixtures can dramatically improve the functionality and ambiance of your space. This is a great example of DIY kitchen renovation ideas that add value.
- Under-Cabinet Lighting: Install adhesive LED strip lights under your upper cabinets to illuminate your countertops. This provides task lighting for food preparation and adds a warm glow to the kitchen. Consider using dimmable lights to adjust the brightness as needed.
- Pendant Lights: Replace your existing overhead lighting with stylish pendant lights. Choose fixtures that complement your kitchen’s style and provide ample light for the entire space. Install dimmer switches to control the brightness and create a more inviting atmosphere. Remember to turn off the breaker before starting any electrical work.
- Replacing Fixtures: Replacing existing light fixtures is usually a straightforward DIY project, but if you’re not comfortable working with electricity, it’s best to hire a qualified electrician. Safety first!

5. Faucet Replacement: A Simple Upgrade
Replacing your kitchen faucet is a surprisingly easy and impactful DIY kitchen renovation ideas. It’s an inexpensive way to update the look of your sink area and improve functionality.
- Step 1: Turn Off the Water Supply. Underneath your sink, locate the shut-off valves for the hot and cold water supply lines. Turn them off completely. Place a bucket under the sink to catch any remaining water.
- Step 2: Disconnect the Old Faucet. Disconnect the water supply lines from the old faucet. Loosen the mounting nuts that hold the faucet in place. Carefully remove the old faucet from the sink.
- Step 3: Install the New Faucet. Install the new faucet according to the manufacturer’s instructions. Connect the water supply lines to the new faucet, ensuring they are securely tightened.
- Step 4: Turn on the Water Supply. Slowly turn on the water supply valves and check for any leaks. Tighten any connections as needed. Run the water for a few minutes to flush out any debris.
- Pro Tip: Before purchasing a new faucet, measure the existing faucet holes in your sink to ensure the new faucet will fit properly.
6. Decorative Touches: Plants, Art, and Accessories
Sometimes the biggest impact comes from the smallest details. Adding decorative touches can significantly enhance the look and feel of your kitchen. This proves that DIY kitchen renovation ideas don’t have to be complex to be effective.
- Plants: Add greenery to your kitchen with potted plants or herbs. Place them on countertops, shelves, or windowsills to bring a touch of nature indoors.
- Art: Hang artwork on the walls to add personality and visual interest. Choose prints or paintings that complement your kitchen’s style and color scheme.
- Accessories: Display your favorite dishes, cookbooks, and kitchen tools on open shelves or countertops. Use decorative containers to store spices, utensils, and other kitchen essentials.
- Personalize: Add personal touches that reflect your style and personality. Display family photos, travel souvenirs, or hand-made items to make the space feel unique and inviting.
7. Upgrade Your Kitchen Island: Paint & Storage Solutions
If you have a kitchen island, consider giving it a makeover to maximize its potential. This is a great way to add both style and functionality to your kitchen. Many exciting DIY kitchen renovation ideas revolve around the kitchen island.
- Paint: Give your kitchen island a fresh coat of paint to coordinate with your cabinets or add a pop of color to the space.
- Storage Solutions: Add storage solutions to your kitchen island, such as drawers, shelves, or pull-out organizers. This will help you maximize space and keep your kitchen organized.
- New Countertop: Consider replacing the countertop on your kitchen island with a new material, such as butcher block or granite. This can transform the look of your island and add durability.
- DIY Features: You can even craft your own custom storage solutions for the island, like wine racks or specialized drawer dividers. Get creative!
Planning Your DIY Kitchen Renovation
Before you start any DIY kitchen renovation ideas, it’s important to plan your project carefully. A well-thought-out plan will help you stay on budget and avoid costly mistakes.
Setting a Realistic Budget
Determine how much you are willing to spend on your kitchen renovation. Factor in the cost of materials, tools, and any professional help you may need. Be sure to have a contingency fund for unexpected expenses.
Creating a Timeline
Develop a timeline for your renovation project. Break down the project into smaller tasks and estimate how long each task will take. This will help you stay on track and avoid delays.
Gathering Inspiration
Look for inspiration online, in magazines, or in other people’s kitchens. Collect photos and ideas that you like and use them to create a vision board for your renovation project. These DIY kitchen renovation ideas can provide a starting point or spark further creativity.
Identifying Your Needs and Wants
Make a list of your needs and wants for your kitchen. Consider how you use your kitchen and what features are most important to you. This will help you prioritize your renovation efforts.
Researching Materials and Products
Research different materials and products that are available for your renovation project. Compare prices, features, and reviews to find the best options for your budget and needs.
Essential Tools and Supplies
Having the right tools and supplies on hand is crucial for a successful DIY kitchen renovation. Here’s a list of some essential items:
- Measuring Tape: For accurate measurements.
- Level: To ensure everything is straight and even.
- Screwdriver Set: For installing hardware and assembling furniture.
- Power Drill: For drilling holes and driving screws.
- Sander: For smoothing surfaces before painting or staining.
- Paintbrushes and Rollers: For painting cabinets and walls.
- Utility Knife: For cutting materials like backsplash tiles.
- Safety Glasses: To protect your eyes from debris.
- Gloves: To protect your hands.
Safety First: Important Precautions
When undertaking any DIY project, safety should always be your top priority.
- Wear appropriate safety gear: Always wear safety glasses and gloves when working with power tools or chemicals.
- Turn off the power: Before working with any electrical wiring, turn off the power at the breaker box.
- Read instructions carefully: Follow the manufacturer’s instructions for all products and tools.
- Work in a well-ventilated area: When working with paints, stains, or chemicals, work in a well-ventilated area to avoid inhaling harmful fumes.
- Get help when needed: Don’t hesitate to ask for help from a friend or family member if you’re not comfortable with a particular task. If electrical work or plumbing is involved and you’re not experience, always hire a professional.
Conclusion
With a little planning and creativity, you can transform your kitchen into a stylish and functional space with these DIY kitchen renovation ideas. From painting cabinets to installing new hardware, there are countless ways to refresh your kitchen on a budget. Remember to prioritize safety, take your time, and enjoy the process. The reward of a beautifully renovated kitchen that you created yourself is well worth the effort!