
Understanding the Fundamentals of Batten Cladding
Horizontal Batten Cladding Installation Guide – Before beginning any installation, it is crucial to understand the components and principles of a horizontal batten cladding system. This is not merely a decorative layer; it is an engineered rainscreen designed to protect the building’s primary structure. The system works by creating a ventilated cavity between the cladding and the main wall.
This air gap serves several vital functions. It allows any moisture that penetrates the cladding to drain away freely, preventing it from becoming trapped against the building’s structural wall. Furthermore, the continuous airflow helps to dry the back of the timber battens and removes moisture-laden air, significantly reducing the risk of rot, mould, and structural decay.
The main components include the external cladding battens, vertical counter-battens that create the cavity, a breathable or weather-resistant membrane, and appropriate fixings. Each element plays a critical role in the system’s overall performance and longevity. Understanding their interplay is one of the most fundamental horizontal batten cladding installation tips you can learn.
Pre-Installation: Planning for Success
Thorough planning is the most critical phase of any cladding project. Rushing this stage often leads to costly mistakes, delays, and a suboptimal finish. A well-considered plan ensures you have the right materials, the necessary tools, and a clear strategy for tackling the installation from start to finish.
This preparatory phase involves three key areas: selecting the appropriate materials for your specific climate and aesthetic goals, gathering all the essential tools and safety equipment, and meticulously preparing the substrate wall. Investing time here will pay dividends in the quality and durability of the final installation. These horizontal batten cladding installation tips on planning are designed to set your project on the right path.
Selecting the Right Materials
The choice of timber will have the most significant impact on the appearance, durability, and maintenance requirements of your cladding. Different wood species offer varying levels of natural resistance to decay and insect attack. Consider the local climate and desired aesthetic when making your selection.
Commonly used timber species include Western Red Cedar, Siberian Larch, and Douglas Fir, all known for their natural durability. Thermally modified timbers, such as ThermoWood or Thermo-Pine, are also excellent choices as the modification process enhances their stability and resistance to rot. For a lower maintenance option, composite or aluminium battens are also available, though they offer a different aesthetic.
Equally important are the fixings. Always use high-quality, corrosion-resistant screws, such as A2 or A4 grade stainless steel, to secure both the counter-battens and the cladding itself. Using inferior fixings is a false economy, as they can rust and stain the timber, and eventually fail, compromising the entire system. One of the most important horizontal batten cladding installation tips is to never compromise on the quality of your materials.
Gathering Essential Tools and Safety Equipment
Having the right tools on hand will make the installation process smoother, safer, and more efficient. A poorly equipped workspace can lead to frustration and inaccurate work. Ensure you have everything you need before you start laying the first batten.
Your essential tool list should include a high-quality tape measure, a spirit level (a longer one is better), and a chalk line for marking out. For cutting, a mitre saw will provide clean, accurate cuts, which is essential for neat corners and joins. You will also need a power drill or impact driver with the correct bits for your chosen fixings, as well as a hammer, a utility knife, and a staple gun for the membrane.
Safety should always be a priority. Always wear safety glasses to protect your eyes from sawdust and debris. A dust mask is crucial when cutting timber, especially treated or arousing timbers. Sturdy work gloves will protect your hands, and if working at height, ensure you have stable and secure scaffolding or work platforms.
Preparing the Substrate Wall
The substrate is the underlying structural wall to which the cladding system will be attached. This wall must be in good condition, sound, and relatively flat before you begin. Any underlying issues must be addressed first, as they will be much harder to fix once the cladding is installed.
Start by thoroughly cleaning the wall surface, removing any dirt, loose paint, or organic growth like moss or algae. Inspect the wall for any cracks, holes, or damage and carry out any necessary repairs using an appropriate filler or mortar. A professional tip from our horizontal batten cladding installation tips collection is to check the wall for flatness using a long straight edge; significant undulations may require packing behind the counter-battens to create a plumb and true framework.
Finally, ensure the wall is weathertight. This is the last line of defense, so any issues with damp penetration must be resolved. Once the wall is clean, repaired, and sound, you are ready to begin the installation process itself.
The Core Installation Process: A Step-by-Step Guide
With all the planning and preparation complete, you can now begin the physical installation. This process should be approached methodically, paying close attention to detail at every stage. Accuracy is key to achieving a professional finish, from installing the membrane to fixing the final batten.
This section breaks down the installation into logical, manageable steps. We will cover the installation of the protective membrane and the essential counter-batten framework. Following that, we’ll detail the process of attaching the horizontal cladding itself, including critical horizontal batten cladding installation tips for spacing and detailing.
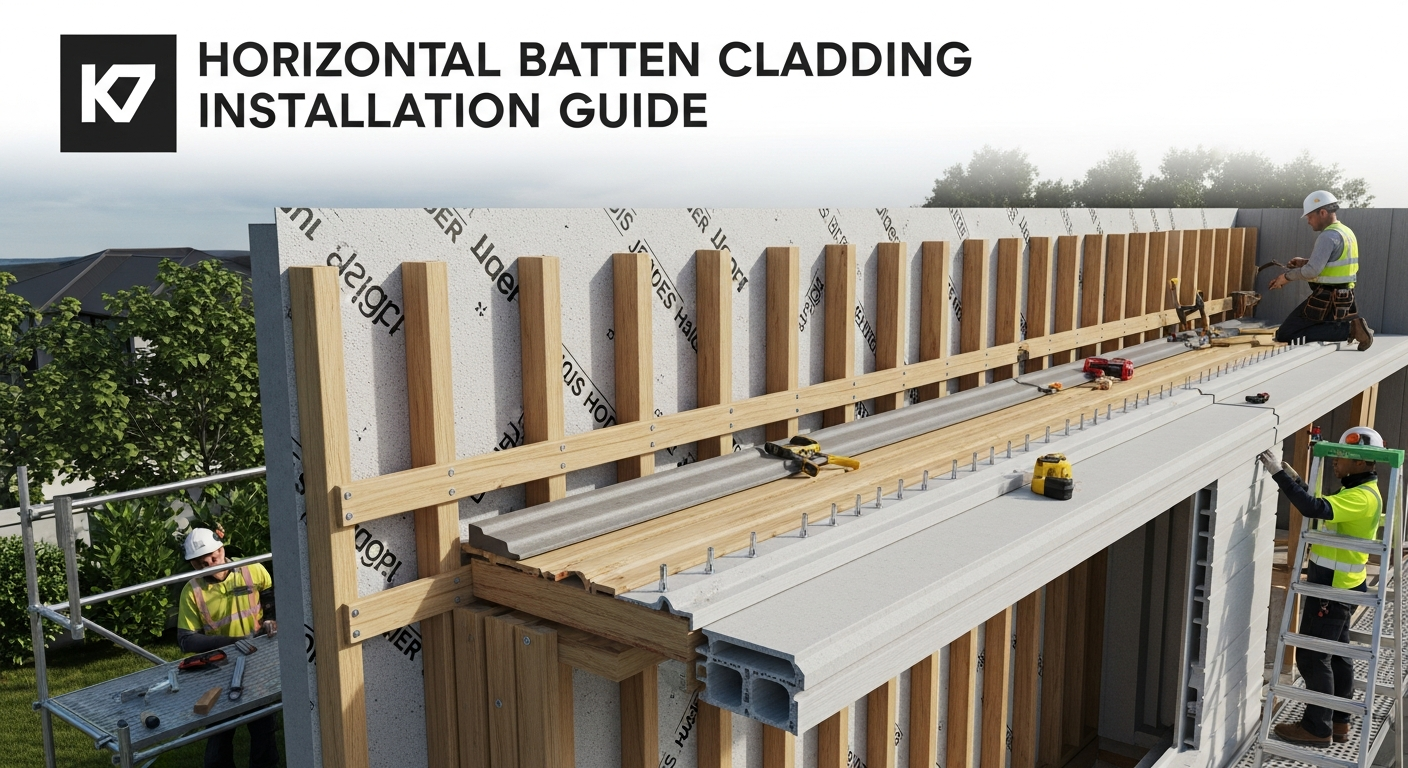
Step 1: Installing the Breather Membrane and Vertical Counter-Battens
The first layer to be installed is the breather membrane or weather-resistant barrier (WRB). This membrane is fixed directly to the substrate wall and acts as a secondary line of defense against wind-driven rain while allowing water vapour from inside the building to escape. This function is vital for the health of the building’s structure.
Start at the bottom of the wall, rolling the membrane out horizontally and fixing it temporarily with staples. Ensure each subsequent course overlaps the one below by at least 150mm (6 inches) to create a weatherproof seal, much like tiles on a roof. All vertical laps should also overlap by 150mm and be positioned over a solid stud or sheathing. Many horizontal batten cladding installation tips guides recommend taping all seams with the manufacturer’s recommended flashing tape for maximum airtightness and water resistance.
Once the membrane is in place, you can install the vertical counter-battens. These are the structural supports that your horizontal cladding will be fixed to and are responsible for creating the ventilated cavity. These battens should be made from durable, pressure-treated timber and must be thick enough to create a cavity of at least 25mm, though 38-50mm is often recommended for optimal airflow.
The counter-battens are fixed vertically, through the membrane, and into the building’s structural frame (e.g., wall studs). The spacing is critical; they are typically installed at 400mm to 600mm centres. Use a spirit level to ensure each batten is perfectly plumb, using packers where necessary to accommodate any unevenness in the wall. Following these horizontal batten cladding installation tips on counter-batten installation is crucial for a flat and stable final surface.
Step 2: Fixing the Horizontal Cladding Battens
With the counter-batten framework securely in place, you can begin installing the horizontal cladding battens. This is the most visible part of the project, where precision and care will truly show. The goal is to create perfectly level, evenly spaced lines that flow seamlessly across the building’s facade.
Always start with the bottom-most batten. This first course is the most important, as all subsequent battens will reference it. Use a spirit level to ensure it is perfectly horizontal before fixing it in place. A starter trim or insect mesh should be installed at the base of the cavity before this first batten is fixed to prevent pests from entering the air gap.
Each batten should be fixed to every vertical counter-batten it crosses. It is best practice to pre-drill pilot holes for the screws, especially near the ends of the boards, to prevent the timber from splitting. Use two fixings per batten at each crossing point for wider boards, or one if the boards are narrow (less than 100mm). One of the most-repeated horizontal batten cladding installation tips is to ensure your fixings penetrate at least 25mm into the solid structure of the counter-batten.
Continue working your way up the wall, using spacer blocks to maintain a consistent gap between each course. Regularly check for level every few rows to ensure you are not drifting off course. A simple but effective technique is to use offcuts of timber of the desired gap width as temporary spacers while you fix the next board in place.
Mastering Batten Spacing and Expansion Gaps
The gap between your horizontal battens is a key design element, but it also serves a technical purpose. This gap allows for air movement and accommodates the natural expansion and contraction of the timber as it responds to changes in humidity and temperature. The size of the gap is an aesthetic choice, but it is typically between 5mm and 15mm.
Consistency is paramount. Any variation in the gap size will be immediately noticeable and will detract from the clean, linear aesthetic. Using consistent spacers, as mentioned previously, is the best way to achieve this. Be aware that wood is a natural material and can have slight variations in width, so measure and adjust as you go.
You must also account for expansion at the ends of the boards. Where two battens meet in a butt joint, a small expansion gap of 2-3mm should be left. These joins should always be made over the centre of a vertical counter-batten so that both board ends are securely fixed. For a more professional look, and as one of our premium horizontal batten cladding installation tips, consider cutting the ends at a 45-degree angle to create a ‘V’ groove, which can help disguise the joint and any minor movement.
Detailing Around Windows, Doors, and Corners
The way you handle details like windows, doors, and corners will distinguish a professional installation from an amateur one. These areas require careful cutting and finishing to ensure they are both weathertight and visually appealing. Proper detailing is one of the most challenging but rewarding aspects of the job.
For windows and doors, the cladding should be framed with appropriate trims or scribed carefully to the opening. The vertical counter-battens should be installed around the perimeter of all openings to provide a solid fixing point. Crucially, ensure that a weatherproof flashing is correctly installed over the head of the window or door, tucked up behind the breather membrane, and extending out over the opening to direct water away.
Corners can be finished in several ways. The simplest method is to butt the boards up to a pre-made corner trim piece. A more sophisticated finish is achieved with mitered corners, where the ends of the battens are cut at a 45-degree angle to meet perfectly. This requires a high degree of accuracy with your mitre saw but offers the cleanest look. Another popular option is a ‘lapped’ corner, where the battens on one face extend past the corner and the battens on the adjacent face are cut to butt up against them, creating a neat overlap. Adhering to these specific horizontal batten cladding installation tips for details will elevate the quality of your project tremendously.

Finishing and Protective Treatments: Preserving Beauty and Performance
Once all horizontal battens are securely installed and the structure has taken shape, attention turns to the final yet equally crucial stage — the finishing and protective treatment. This step is where craftsmanship meets preservation. It not only defines the visual character of the façade but also determines how well the cladding will stand the test of time against New Zealand’s diverse and often demanding climate.
The choice of finish should never be an afterthought. It’s a decision that blends aesthetics, maintenance requirements, and environmental exposure — ideally planned early in the design phase alongside material selection. Whether your goal is to celebrate the natural warmth of timber or to embrace the graceful aging process of uncoated wood, understanding the finishing horizontal batten cladding installation tips ensures your façade remains both beautiful and resilient for years to come.
Choosing the Right Finish: Function Meets Design
The first consideration is the desired appearance. Timber battens offer remarkable flexibility in finish options, ranging from transparent oils that preserve grain visibility to opaque coatings that create uniform colour and texture. However, the selected product also plays a major role in protecting the cladding from UV radiation, moisture ingress, and biological growth.
If maintaining the timber’s original tone and richness is a priority, a UV-protective oil or translucent stain is the preferred choice. These finishes penetrate the wood rather than sitting on top, allowing the grain to remain visible while forming a barrier against the sun’s harsh rays. They significantly slow the natural silvering process, preserve depth of colour, and add a layer of moisture resistance.
To ensure durability, these coatings should be reapplied every two to five years, depending on factors like orientation, exposure, and product type. Walls facing north or west — the directions that receive the most sun — will typically require more frequent maintenance. Always follow the manufacturer’s reapplication guidelines and apply coatings in suitable weather conditions to achieve optimal absorption and curing.
The Natural Weathering Option
Alternatively, some homeowners and architects choose to let nature take its course. Certain durable species — such as Western Red Cedar, Larch, or thermally modified timbers — can be left unfinished to develop a naturally weathered patina. Over time, these woods transition from warm honey or reddish tones to elegant shades of silvery-grey, creating a timeless, organic look that complements modern architectural forms.
This approach offers the lowest maintenance solution, as no periodic recoating is required. However, it’s important to understand that the process of weathering is inherently uneven. The degree of exposure to sunlight, wind, and rain can result in subtle tonal variations across the façade — a characteristic that many designers and homeowners celebrate as part of the timber’s natural story.
For this reason, allowing timber to weather gracefully is best suited for those who appreciate the authentic, evolving character of natural materials rather than a uniform, freshly finished appearance.
Preparation and Application Best Practices
Before applying any coating, the surface must be clean, dry, and free of dust or contaminants. If the battens were exposed to the elements before installation, lightly sanding or brushing the surface can open the grain and improve adhesion. Applying the finish to all faces of the timber, including the back and end grains, offers superior protection against moisture movement and potential warping — a key detail often overlooked during installation.
For the best results:
-
Pre-coat battens before installation where possible, particularly in high-exposure areas.
-
Apply finishes with a brush or sprayer following the timber’s grain direction for even absorption.
-
Seal end grains thoroughly, as they are the most vulnerable points for water ingress.
-
Inspect annually for signs of fading, cracking, or water staining to determine when maintenance is needed.
Following these finishing horizontal batten cladding installation tips ensures that your façade maintains its visual integrity while performing effectively against New Zealand’s changing weather conditions.
.
Conclusion: Achieving a Professional and Durable Finish
Installing horizontal batten cladding is a rewarding project that can dramatically transform the appearance of a building. By combining a modern aesthetic with the proven principles of a ventilated rainscreen, it offers both beauty and high-performance protection. Success lies in meticulous planning, the use of high-quality materials, and a patient, precise approach to the installation itself.
From preparing the substrate to applying the final finish, every step is crucial. This guide has provided you with a comprehensive overview and countless horizontal batten cladding installation tips to help you navigate the process. Remember to prioritize safety, double-check your measurements, and take pride in your craftsmanship to create a stunning, durable, and professional-quality facade that will stand the test of time.